| Some Information from The Official F-15 Strike Eagle Handbook (Richard SHEFFIELD), Flight Sim Books.comMission:To research and compare notes on tactics, strategies, and philosophies on VF, VHT, and related technologies towards a greater understanding of the machines and their capabilities.Non-PC version: Compare notes on better ways to kill people and break things.HistoryThe United Galaxies Council Spacy Fighter Weapons School was established on 18 November, 2169 at NAS Miramar, California, Terra, Sol. Formally, the RDF had taken over the old United States Navy FWTS shortly after the US entered the Internationalists as part of the UN's pilot Defense Forces program; At this point the agency that would become the RDF had no formal name, and it's mission had yet to be finalized.The original school was the end result of a study, published in May 1968, by USN Captain Frank AULT who (at the direction of the CNO) researched the failings of the US air to air missiles used in aerial combat in the skies over North Viet Nam in what became known as the "Ault Report" came to the conclusion that inadequate air-crew training in air combat maneuvering (ACM) skills was the root of this problem. The conclusions of the "Ault Report" were not news to the F-8 Crusader community, who had been lobbying for an ACM training program ever since the commencement of Rolling Thunder in 1965.The Report recommended establishment of an "Advanced Fighter Weapons School" to revive and disseminate community fighter expertise throughout the fleet. At the time of official founding it received relatively scant funding and resources, and built its syllabus from scratch, while borrowing aircraft from its parent unit as well as other units to support the practical aspects of their operations. Its objective was to develop, refine and teach aerial dogfight tactics and techniques to selected fleet air crews, using the concept of Dissimilar Air Combat Training (DACT), using stand-in aircraft to realistically replicate expected threat aircraft.Air crews selected to attend the TOPGUN course were chosen from front-line units. Upon graduating, these crews would return to their parent fleet units to relay what they had learned to their fellow squadron mates, becoming instructors themselves.During the halt in the bombing campaign against North Viet Nam (in force from 1968 until the early 1970s), TOPGUN established itself as a center of excellence in fighter doctrine, tactics and training. According to the Navy, the results were dramatic, with kill-to-loss ratio against the North Viet Namese Air Force soaring from 3.7:1 (1965-1967) to 13:1 (post 1970). The success of the U.S. Navy fighter crews vindicated the fledging DACT school's existence.Largely due to the end of the cold war in the 1990s, the TOPGUN syllabus was modified to include more emphasis on the air-to-ground strike mission as a result of the expanding multi-mission taskings of the F-14 and F/A-18. With the entry of the US into the UWG, the F-18's were replaced by a collection of fighters from all over the world, but also an integration of Destroids and other ground combat systems to give students a chance to practice ground-support missions.CourseTOPGUN conducts four "Power Projection" classes a year. Each class lasts nine weeks and consists of nine Navy and Marine Corps strike fighter aircraft. The TOPGUN course is designed to train already experienced Navy and Marine Corps aircrews at the graduate level in all aspects of strike-fighter aircraft employment, which includes tactics, hardware, techniques and the current world threat for air-to-air and air-to-ground missions. The course includes eighty hours of lectures and twenty-five flights that pit students against TOPGUN instructors. When a pilot or WSO completes the TOPGUN course s/he will return as a Training Officer carrying the latest tactical doctrine back to their operational squadron, or go directly to an FRS squadron to teach new aircrews. SFTIs can also become instructors themselves at TOPGUN later in their career. Each year, a small number of aircrews do not meet TOPGUN's standards and are dropped from the course.TOPGUN trains four to six Air Intercept Controllers in each class on advanced command, control, and combat communication skills. They are completely integrated in the course and participate in most of the training missions. These "AIC" students go back to their Carrier Air Wings after graduation and are given the responsibility of training all the air controllers and fighters in their Carrier Strike Groups in the art of air intercept control.TOPGUN also conducts an Adversary Training Course, flying with adversary aircrew from each Navy and Marine Corps adversary squadron. These pilots receive individual instruction in threat simulation, effective threat presentation and adversary tactics. TOPGUN provides academics and flight training to each Carrier Air Wing during their Integrated and Advanced Training Phases which are large scale exercises that can involve as many as fifty aircraft. These large scale exercises serve as "dress rehearsals" for future combat scenarios. In addition to training crews, TOPGUN also conducts ground school courses six times a year. The Training Officer Ground School (TOGS) offers graduate level academics to Fleet aviators, adversary instructors and other officers and enlisted personnel. TOPGUN holds a Strike-Fighter Tactics Refresher Course (also known as "Re-Blue") once a year, usually in the fall, bringing current fleet SFTIs back to Fallon for a 2 day refresher, updating TOPGUN's recommendations.Most significantly, the UGC integrated into the program the former US Air Force's William Tell, a biennial fighter gunnery competition where teams representing the various major commands of the USAF competed in live-fire exercises, using towed banner targets for gun engagements, and obsolete fighters converted into unmanned target drones for air-to-air missile engagements. Whereas TOPGUN focused solely on improving the fighter pilot's skills, William Tell tested the whole command; Logistics, Maintenance, Command And control, etc, all tested under real-world conditions (including one particularly noteworthy incident in which some members of the air wing were in the shower; after this specific measures were taken to ensure this would not happen again, though it's reported the guys involved didn't mind, and no investigation ever came of it).Under the resurrected TOPGUN, the ground crews of the aircraft were also brought along to develop their skills, and improve them wherever possible. Finally, the program was moved from Terra to the Lagrande Nueva Space Staion at Johanes Point, Garuda.Contents: |
| Low on ammo, in gravity well (such as a planet). Airborne threat of equal or LESS mass preferably.Theory: In air-to-air combat, convert to Guardian mode. Grapple with and hold onto the enemy Mecha/aircraft. Hold TIGHT. Convert (if possible) to Battloid mode, up-angle thrusters to a 0º hard dive, dragging bandit with you. At or about 150-200 feet, release and pull up HARD; Bandit crashes.Practical Application: Limited to fair success. Especially effective on severely inferior craft (fighter plane V. Veritech, for example) especially when thrust/weight ratio favor the aggressor, or inferior pilots (whether or not they have more overall cockpit time).History: Lt (jg) Jeremy "Doc" LEE first attempted this maneuver defending a LISA HUNTER-HAYES-Class carrier from a Tiresian-Empire era Glaug (Officer Battle Pod). While Lt Lee was unsuccessful, his wingman, Ens Fredrick "Jason" KRUGER used the same trick moments later; Ens Kruger, however, rode the VT into the ground, ejecting at 100 feet. Due the LACK of sufficient height, Ens Kruger's chute failed to fully deploy, and all 6 bones in his legs were broken along with a major fracture, though not a full break, in his pelvic bone. After this, doctrine dictated that hard deck for this maneuver was 150 FIRM; Below this, the chute can not open properly.Aftermath: Shortly after being released from the hospital, Doc beat the crap outta Krug (partly in retaliation for scaring him, partly for crashing the VT, and partly for stealing his idea).WARNING: THIS IS A ULTRA-HIGH GEE MANUVER. This maneuver should ONLY be attempted high experienced pilots. |
Vertical insertation of VHT's into hot LZ.With additional commentary by: Stephen "FPilot" BIERCE.Theory: Bolt or CAREFULLY glue WB-417 Disposable Poly-Carbonate Wing Boards to a VHT's legs; Drop them out a delivery platform (such as a GARFISH-Class assault ship), using the disposable planes to control decent, like a glider.Practical Application: Limited success; Though while assigned to 271ST Dragoon I did use this technique, VHT's simply AREN'T gliders. Though we were USSUALLY able to set in within about a ten-mile area, and did so much faster than the slugs (and, more dangerously, their colabs) could keep up with us, this tactic really wasn't much of a success; One out of every ten hard landing resulted in a useless VHT.History: First tried early during the Terran/Invid War. The first using of this tactic was a dismal failure, as 271ST was scattered over a ONE HUNDRED mile area. However, subsequent attempts were more effective, especially after extensive drilling. The best overall technique was to ride the board down to about 10 feet (or so, though REALLY gutsy guys would go further STILL), transform to Tank Mode (which, after all the heating the glue had already gone through, would break the board loose from the tank), then engage foot thrusters at absolute maximum (we're talking over the red line here, people, not simply "running them up a bit"), then switch BACK into Transport mode and engage ALL thrusters full on. This would reduce overall downward momentum to a jarring, but survivable, 2.5 or so gee's.Aftermath: As the enemy doesn't expect the insertation to be as quick (and, often, is expecting the hour or more required to set a ship down safely), they get overwhelmed psychologically. This is added if PychWar guys (usually playing that God-awful "Scratchy") are added to the mix. When all else failed, the tanker could bail out, using a rocket pack to return safely to the ground (parachutes were installed to try to bring the tank down safely, however Invids and Ators were known to shoot at parachutes first).Additional Commentary: Generally NOT as effective in practice as the risks on paper would suggest; However, generally NOT as risky in practice as expected. Overall, however, this tactic ISN'T really the best idea. Did prove highly effect against the Ators. Gluing actually works better, but self-tapping screws/bolts will work if you don't have enough time or glue. Tanks aren't meant to fall out of the sky, which is both a reason it worked (COMPLETELY unexpected) and one reason it didn't simultaneously (the aeronautical techniques are, at best, iffy). In reality, this is mostly a controlled crash, and make no mistake here, it IS a crash (more "crash" than "controlled" at that). The fast insertion of armor into a combat zone was also a Godsend to belaugered infantrymen; The mere WHISPER that 271ST was "coming hot" (or "The Valkries are coming! The Valkries are coming!" as the soldiers themselves would start screaming out) was known to raise moral disproportionate to the actual combat effectiveness of the drop itself. |
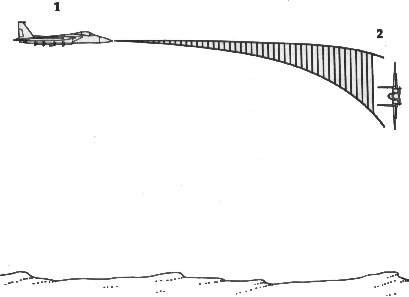
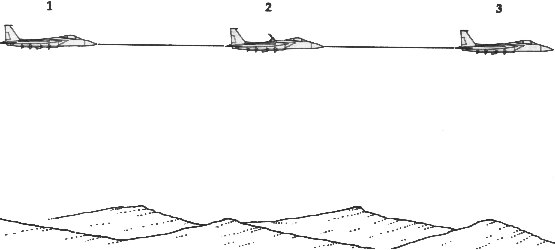
| The Stall Turn. |
|---|
 Minimum Speed: 500 knots (fully loaded); 400 knots (no bombs).Minimum Altitude: None. Pull back on the stick and climb until 90 degrees shows on the climb angle ladder on your screen (1). Climb straight up. As speed decreases, continue to climb (2). Cut power to 70 percent (3). The plane should stall and put you pointing toward the ground (4). Apply 100-percent power and pull back on the stick to fly straight and level, or continue to dive at your target. If you approach Mach 2, be prepared to extend your speedbrake (5). Minimum Speed: 500 knots (fully loaded); 400 knots (no bombs).Minimum Altitude: None. Pull back on the stick and climb until 90 degrees shows on the climb angle ladder on your screen (1). Climb straight up. As speed decreases, continue to climb (2). Cut power to 70 percent (3). The plane should stall and put you pointing toward the ground (4). Apply 100-percent power and pull back on the stick to fly straight and level, or continue to dive at your target. If you approach Mach 2, be prepared to extend your speedbrake (5). |
| Inverted Flight Practice. |
|---|
| Minimum Speed: None.Minimum Altitude: 1000 feet. You're flying straight and level upside down (1). Push forward on the stick to obtain a 10-degree rate of climb (2). Pull back on the stick to obtain a 10-degree dive (3).Push forward on the stick to obtain straight and level flight (4).All stick commands are opposite during inverted flight. This maneuver, as well as turning while inverted, should be practiced until the opposite commands become second nature. In a dogfight, inverted flight is common, and you don't want to turn the wrong way or dive into the ground.Practice flying upside down to get comfortable with the way the aircraft responds to the stick. |
| Speedbrake Extension. |
|---|
 Minimum Speed: 500 knots.Minimum Altitude: None.Extended use of the speedbrake at low speed or high altitude can cause your speed to drop to the stall point. You're flying straight and level (1). Extend your speedbrake. Notice how your speed drops to approximately 75 percent of its original level (2). Remove the speedbrake and notice how the plane quickly accelerates to its previous speed (3).The speed brake is used often in combat to slow your speed in a hurry without slowing down the engine. It's frequently used to avoid overshooting an opponent. Once you've practiced this maneuver, you can try a speedbrake extension in a turn. Your speed will fall much faster due to the added drag of the turn. Minimum Speed: 500 knots.Minimum Altitude: None.Extended use of the speedbrake at low speed or high altitude can cause your speed to drop to the stall point. You're flying straight and level (1). Extend your speedbrake. Notice how your speed drops to approximately 75 percent of its original level (2). Remove the speedbrake and notice how the plane quickly accelerates to its previous speed (3).The speed brake is used often in combat to slow your speed in a hurry without slowing down the engine. It's frequently used to avoid overshooting an opponent. Once you've practiced this maneuver, you can try a speedbrake extension in a turn. Your speed will fall much faster due to the added drag of the turn. |
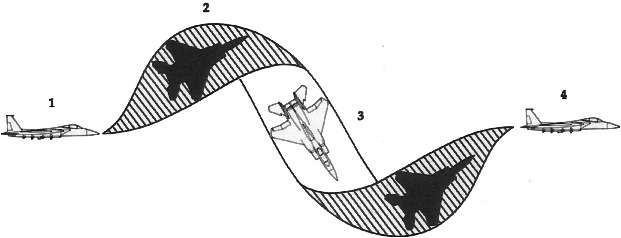
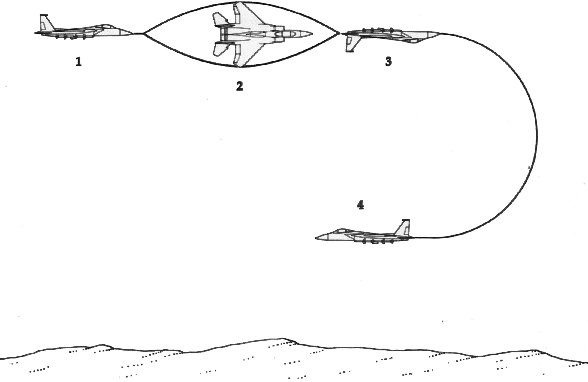
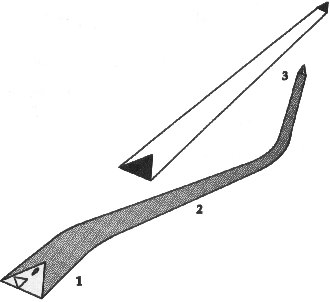
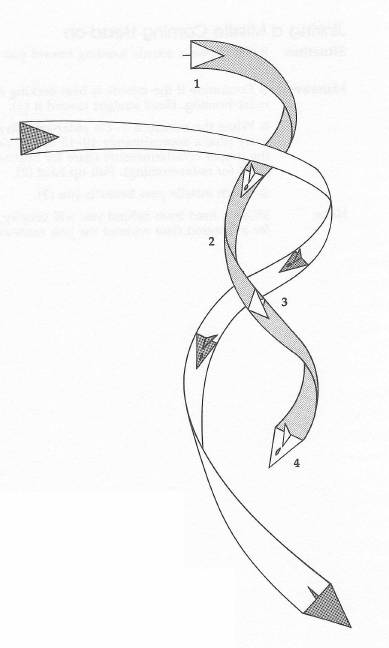
| Low Yo-Yo |
|---|
 Situation: You're in a hard-turning, low-speed fight. You're too close for short-range missiles but you can't out-turn the enemy to line up for a gun shot. Situation: You're in a hard-turning, low-speed fight. You're too close for short-range missiles but you can't out-turn the enemy to line up for a gun shot.
Maneuver:
** Let your upper wing come over, and begin an inverted dive (1). The speed you gain in the dive will let you hold a tight turn toward the bogey without stalling.
** Roll out in the opposite direction and pull the nose up (2).
** Repeat the process until you pull in behind the enemy and can line up a gun shot (3). Be quick on the trigger and ready to fire as you pull up each time. Firing parameters may be met for only a second or two.NOTE This maneuver should not be performed at low altitude.Drop down inside the other aircraft's turn; then pull in behind for a possible shot. |
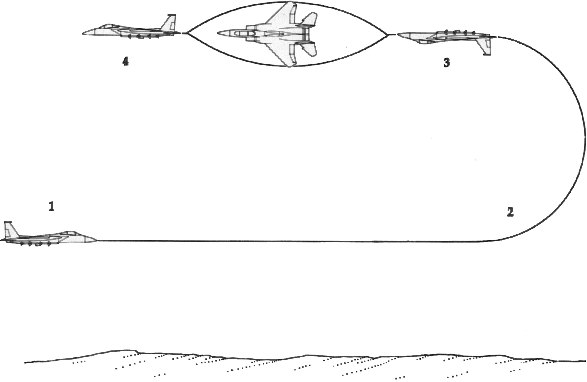
| High Yo-Yo |
|---|
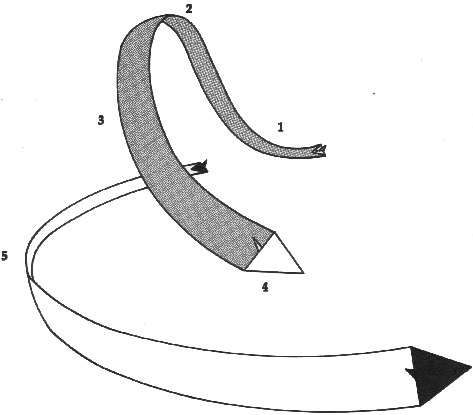 Situation: You're closing rapidly on a turning target from the side or rear. You want to: Situation: You're closing rapidly on a turning target from the side or rear. You want to:
** Avoid overshooting the target and losing your offensive position due to your greater speed.
** Obtain a better position behind the target for improved heat-seeking missile tracking.Maneuver:
** Level your wings and pull up to gain altitude (1).
** Begin turning toward the target, remaining above and behind (2).
** At this point, start an inverted roll and dive at the target (3). You have two options here: You can point your nose slightly ahead of the target and take a Lead-pursuit path to make a diving guns pass, or you can come around behind the target for a heat-seeking missile shot directly at the target's tailpipe (4).
** If the target reverses its turn at position 5, you should get a clean shot at its tail. If you fail to destroy the opponent, or if you miss, another High Yo-Yo or a Low Yo-Yo will return you to an attacking position.WARNING Be careful not to bleed off too much speed during the climbing portion of this maneuver or the bogey may be able to accelerate out of range.While the other aircraft is breaking hard, pull up, then pull down to get behind him. |
| Straight Yo-Yo |
|---|
 Situation: The enemy aircraft is making a break for it, trying to outrun you. In this situation, if you don't want to use your afterburners because your fuel level is low, you can trade altitude for speed.Maneuver: Situation: The enemy aircraft is making a break for it, trying to outrun you. In this situation, if you don't want to use your afterburners because your fuel level is low, you can trade altitude for speed.Maneuver:
** Obtain a position directly behind the enemy aircraft (1).
** Remaining directly behind your opponent, begin a shallow (10- to 20-degree) dive (2).
** Notice your airspeed rising. As you close on the enemy, pull up to slow down and prevent an overshoot (3).Trade altitude for speed by going into a shallow dive and then pulling up when you're within range. |
| Barrel Roll Attack |
|---|
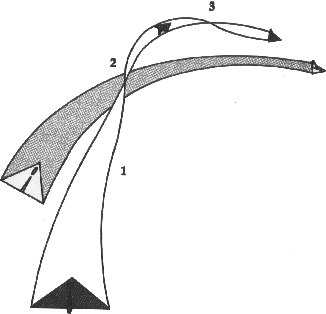 Situation: You're approaching an opponent from behind. The other aircraft turns hard, and your speed advantage may cause an overshoot.Maneuver: Situation: You're approaching an opponent from behind. The other aircraft turns hard, and your speed advantage may cause an overshoot.Maneuver:
** The enemy aircraft breaks hard to the right. You should pull up hard (1).
** Immediately begin a Barrel Roll to the left, away from your opponent (2). This should cause you to bleed off some speed so you don't overshoot.
** Finish the maneuver by sliding back in behind the enemy plane with a hard right turn (3).Instead of overshooting, pull up and roll away from your opponent. Slide back into firing position with another turn, this time toward the target. |
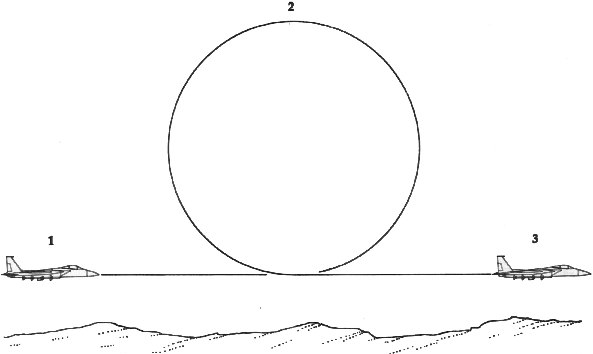
| Zoom Maneuver from a Turn |
|---|
 Situation: You're in a hard-turning fight. You can't obtain an advantage, and you're too close for a missile shot. Both you and your opponent are at low speed. The object here is to use your high thrust-to-weight ratio to perform a steep climb so you can get enough distance between you and the enemy to use your missiles.Maneuver: Situation: You're in a hard-turning fight. You can't obtain an advantage, and you're too close for a missile shot. Both you and your opponent are at low speed. The object here is to use your high thrust-to-weight ratio to perform a steep climb so you can get enough distance between you and the enemy to use your missiles.Maneuver:
** Fire your afterburners (1).
** Execute a very steep climb (2).
** Continue until you've climbed 5000 feet or so. Throttle back your engines and perform a stall turn (3).
** As soon as your opponent comes into view, fire a short-range missile.CAUTION While climbing, you may present your opponent with a good missile shot. Take an occasional look out the back and try to time your zoom so that the bogey isn't in a position to shoot.Your jet can perform a ballistic climb. Use this advantage to put some distance between you and the enemy. |
| Dive for Separation for a Missile Shot |
|---|
 Situation: You're in a very close, hard-turning fight and you've climbed to high altitude in the process. You're too close for a missile shot, but you can't line up your hard-maneuvering opponent for a gun shot. This maneuver puts distance between the two of you for a better chance at a missile hit.Maneuver: Situation: You're in a very close, hard-turning fight and you've climbed to high altitude in the process. You're too close for a missile shot, but you can't line up your hard-maneuvering opponent for a gun shot. This maneuver puts distance between the two of you for a better chance at a missile hit.Maneuver:
** Bank hard and try to pull inside the enemy's turn (1).
** Roll inverted, pull back on the stick and dive (2).
** Keep the nose pointed straight down until you've lost 10,000 feet or so. Then pull back hard on the stick and keep it pulled back until you pull out of the dive and head back up toward the target.
** Locate the enemy aircraft and fire a short-range missile (3).CAUTION Diving with afterburners on will cause a rapid loss of altitude and may cause you to exceed the maximum design speed for the aircraft.Another way to separate from the enemy (and thus have enough distance to use a missile) is to dive away before firing. |
| High-G Barrel Roll. |
|---|
 Situation: An enemy aircraft is close behind, closing for a gun attack.Maneuver: Situation: An enemy aircraft is close behind, closing for a gun attack.Maneuver:
** Break hard into the attack (1).
** Perform a Barrel Roll in the opposite direction. This could bleed off some speed and make the attacker overshoot (2).
** Roll in behind the target for a gun or short-range missile shot (3).Do a Barrel Roll away from the enemy; then roll back behind him for a tailpipe shot. |
| Disengagement. |
|---|
Situation: You're in a low-speed, hard-turning fight and can't gain an advantage after several turns. Sometimes the best maneuver is to disengage and reposition to attack again under better conditions.Maneuver:
** Roll inverted (1).
** Pull back on the stick to start a steep dive (2).
** Keep the stick pulled back until you pull out right-side up but heading in the opposite direction (3).
Timing has a lot to do with the success of your disengagement attempt. If possible, make your move in one direction when the bogey is headed in the other.Roll upside-down and put your fighter into a steep dive. You'll end up with a heading 180 degrees from your original. |
| Speedbrake Reversal. |
|---|
 Situation: An attacker is closing fast from behind.Maneuver: Situation: An attacker is closing fast from behind.Maneuver:
** Level out your wings (1).
** Cut your engines, pull up hard, and extend your speedbrake (2).
** As soon as the attacker appears on your screen (overshoots), retract the speedbrake and be prepared to turn hard to follow, or take a missile shot and disengage.You must be quick to react on this one; the bogey won't like being out in front of you and will turn hard very quickly. You'll only have a good shot for a split second.CAUTION Using a speedbrake reversal with less than 400 knots of airspeed won't leave you much speed for maneuvering. Use this with caution when flying at low speed.Force the other aircraft to overshoot by extending your speedbrake. |
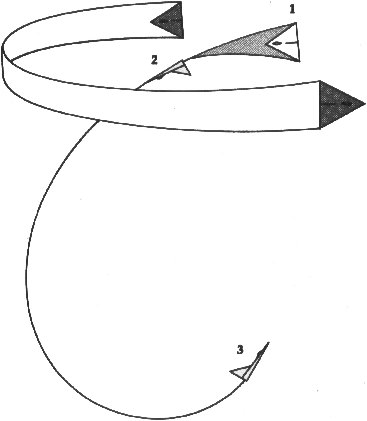
| Defensive Spiral Dive. |
|---|
 Situation: An enemy aircraft has closed to within firing distance behind you. You have at least 15,000 feet of altitude, and you want to (a) disrupt the enemy's aiming process, (b) escape, and (c) if possible, reverse the situation.Maneuver: Situation: An enemy aircraft has closed to within firing distance behind you. You have at least 15,000 feet of altitude, and you want to (a) disrupt the enemy's aiming process, (b) escape, and (c) if possible, reverse the situation.Maneuver:
** Roll to an inverted position (1).
** Pull back on the stick to start the dive (2).
** Determine the position of the attacker (3).
** Begin rolling toward the attacker. In other words, if he's to your left, push the stick to the left (4).
** As your speed builds, cut power to idle and extend your airbrake.
** If the attacker follows you down, he may overshoot at this point and allow you to take a shot.There's a chance the attacker may overshoot If you use this splraling maneuver. |
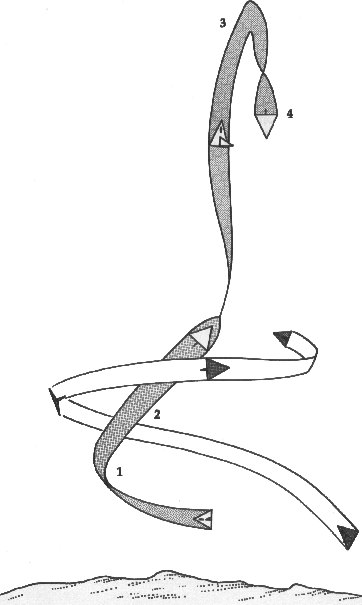
| Vertical Spiral. |
|---|
 Situation: You're being out-turned by an enemy aircraft. Your opponent is pulling around behind you. The Vertical Spiral lets you take advantage of the excellent design of your aircraft—the F-15 can climb while it's in a hard turn.Maneuver: Situation: You're being out-turned by an enemy aircraft. Your opponent is pulling around behind you. The Vertical Spiral lets you take advantage of the excellent design of your aircraft—the F-15 can climb while it's in a hard turn.Maneuver:
** Pull the nose up to a 30-degree climb (1).
** Roll into the attack and light your afterburners. Hold this climbing turn until you've gained 5,000-10,000 feet or so in altitude. Most air-to-air missiles fired at you will be from behind during this maneuver and can be defeated with a properly timed flare (2).
** Cut your afterburners. Locate the enemy and take a missile shot (3). Depending upon the quality of the enemy aircraft, he may or may not be able to follow you up. Also your F-15 may have a higher ceiling (max altitude) than some of the older enemy aircraft, allowing you to gain an advantage even if they try to follow you up.Climb and turn at the same time; then locate the target and fire or dive. |
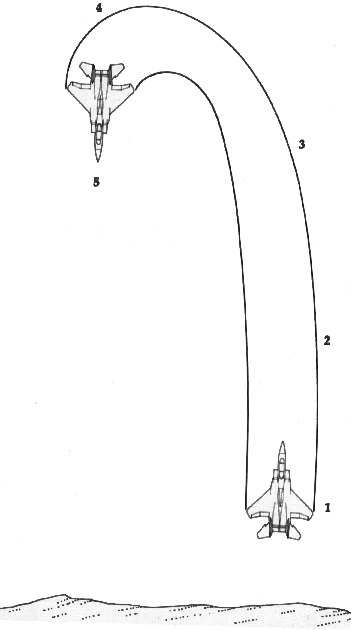
| Pitch Back. |
|---|
 Situation: You're attacking your opponent head-on with at least 500 knots of airspeed.Maneuver: Situation: You're attacking your opponent head-on with at least 500 knots of airspeed.Maneuver:
** You're in a head-on pass (1).
** Pull up into a loop maneuver (2).
** At the top of the loop, keep the stick pulled back (3).
** When you're heading straight toward the ground, start to turn toward the enemy while pulling out of the dive (4).
** Instead of finishing the loop heading in your original direction, you've turned on the way down and should finish in a hard turn behind your opponent (5).This kind of maneuver is called an out-of-plane—you're maneuvering in the vertical plane while your opponent is in a flat turn. This is a very good opening move if you suspect you can't out-turn your opponent due to greater airspeed. Use your energy advantage to go vertical.This maneuver looks tricky, and it is. Pull back hard on the stick, loop, and then turn behind the target if it's there. |
| Head-On Gun Attack. |
|---|
 Situation: You're approaching enemy aircraft head-on. You're too close for a missile shot, but you can still take a guns shot before he flashes past you.Maneuver: Situation: You're approaching enemy aircraft head-on. You're too close for a missile shot, but you can still take a guns shot before he flashes past you.Maneuver:
** Line up with the enemy straight ahead, at the same altitude (1).
** Start firing when the enemy is approximately 1½ radar screen divisions away. The target will fly to meet the gun shells. If you wait until the enemy aircraft is within normal gun range, you'll fly past before you get a good shot (2).NOTE A head-on attack presents a bad missile angle for your opponent. If you make the enemy pilot waste one of his missiles during the head-on pass, so much the better. Be prepared to jink, though.Fire while the enemy aircraft is still out of range in a head-on cannon attack. |
| Head-On Turning Attack. |
|---|
 Situation: You're approaching an opponent head-on at slow speed (400-500 knots). This speed allows maximum turning performance, which is to your advantage. Remember to increase the throttle during the turn to prevent a stall.Maneuver: Situation: You're approaching an opponent head-on at slow speed (400-500 knots). This speed allows maximum turning performance, which is to your advantage. Remember to increase the throttle during the turn to prevent a stall.Maneuver:
** Head slightly to one side of your opponent to get some lateral separation during the initial pass (1).
** Turn hard toward your opponent as you pass (2).
** Maintain this maximum-G turn. You may need to increase power during the turn to keep your speed up to 400 knots (3).
** If you can out-turn your opponent, you should get a missile shot (4).This isn't a long-term maneuver. If you don't gain an advantage fairly quickly, be ready to disengage or attempt another maneuver, such as a Low Yo-Yo. Spinning around and around with a single bogey will likely draw a number of his buddies to the area. Don't get so wrapped up that you let another bogey come in and gun you down.Your turning performance must be better than your opponent's for this maneuver to work. |
| A Series Of Yo-Yos. |
|---|
| After a head-on pass, you can use a series of Low Yo-Yo maneuvers (described and illustrated earlier) to pull around on the tail of the bogey. This maneuver can be used even if you don't have a turning advantage over your opponent.Yo-Yo maneuvers are some of the best moves you can learn. Master them, and they'll come in handy in a number of situations. |
| Jinking a Missile Coming Head-On. |
|---|
| Situation: Radar shows a missile heading toward you from in front.Maneuver: Determine if the missile is heat-seeking or radar-homing. Head straight toward it (1). When the missile is 1 to 1½ radar grid divisions away (approximately 10-15 miles), release the proper countermeasure (flare for heat-seeker, ECM for radar-homing). Pull up hard(2). Watch the missile pass beneath you (3).NOTE Missiles fired from behind you will usually head for a released flare without the jink maneuver. |
| Avoid Enemy Overflight. |
|---|
| Radar isn't the only way the enemy can locate you. It can also "see" and "hear" you if you fly too close to an enemy location. Therefore, if you don't intend to bomb a target, it's to your advantage to fly around it rather than directly over it. Otherwise, you may have a lot of company.On the other hand, if you're looking for trouble, flying over an airfield should generate a lot of action. |
| Totally Defensive. |
|---|
When entering into an attack on two opponents, you're violating Oswald Boelcke's first rule of air combat: Always attack with an advantage. Reconsider if you have several other factors against you, such as low fuel or control problems due to previous missile hits. If you decide to make a run for it, here's what you should do:
** Drop all bombs.
** Fire a missile at one of the targets, even if you're out of range—you may get lucky.
** If you have the necessary altitude, perform a Split-S and begin an unloaded acceleration toward base (use the afterburners if you have enough fuel).
** If you're at low altitude and have plenty of fuel, use your afterburners either to escape at low altitude or go straight up and hope they can't follow you. |
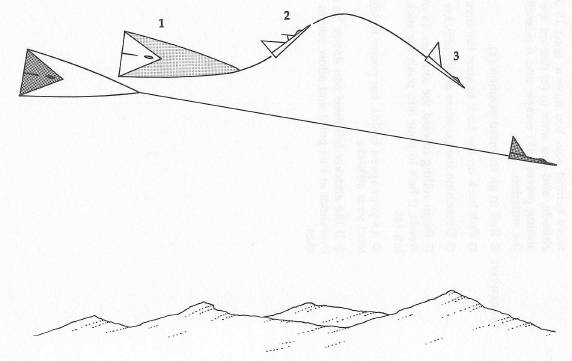
| Cautiously Aggressive. |
|---|
 | | Figure 6-1. Cautiously Aggressive |
|---|
To attack two opponents, your aircraft must be undamaged and you should have adequate fuel and weapons. But maybe you're still carrying bombs you'll need for a ground attack later; now is a good time to consider a cautious attack.
** Arm and fire a medium-range missile at one opponent (1).
** Light the afterburners and fly head-on toward the second aircraft, offering the worst possible missile target (2).
** Pass beneath the enemy and try to obtain 10-20 miles of separation.
** Shut down the burners, but stay at 100-percent power.
** Keeping up your speed, make a broad sweeping turn, staying out of short-missile range but within range for your medium-range missiles (3).
** Keep firing Sparrows at your opponent until one strikes home.
** Close in for a one-on-one with the other target. |
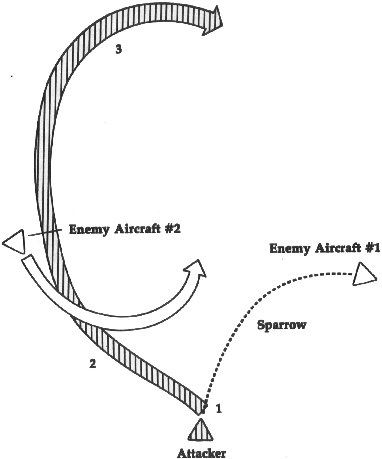
| Totally Aggressive. |
|---|
 | | Figure 6-2. Totally Aggressive Attack |
|---|
To carry out a totally aggressive attack on two opponents may be exciting, but it's also very dangerous (or as dangerous as a simulation can get). History, however, is full of successful one-on-two accounts, so if the right opportunity presents itself, don't hesitate.To aggressively attack two opponents, your bombs should be gone, and you should have plenty of fuel and at least two Sidewinders and two Sparrows.
** Fire off a Sparrow at one opponent to keep him busy for a minute or so (1).
** Head straight for enemy aircraft #2. You'll certainly have to dodge missiles here, so keep an eye out. An extra pair of hands and eyes here is very helpful (2).
** As you approach #2, cut power and try to out-turn your opponent for a gun shot (3).
** Keep an eye on the Sparrow that's chasing target #1. If the missile hits or runs out of fuel, fire a Sidewinder at #2.
** If the Sparrow you first shot missed and a Sidewinder shot at #2 also misses, break off the attack. Disengage and build up some airspeed; then repeat this procedure until one of the targets goes down.
** Move in for a one-on-one attack. |
| Attacking High-Threat Targets. |
|---|
 | | Figure 9-4. Offset Attack on a High-Threat Target. |
|---|
Anytime you're trying to destroy a SAM radar, missile, or anything located next to a SAM site, you're heading into a high-threat area. If the SAM has Doppler-guided missiles, the threat is higher still. In order to get close enough to launch a Maverick, you'll have to head toward the target; however, heading directly toward it may not be the best path. An indirect route known as an offset approach might be a safer choice.Position 1. To use this approach you start off heading directly toward the SAM site.Position 2. When the site launches a missile at you, wait a second or two so you can get closer to the target; then turn away on a perpendicular course to fool the missile.Position 3. Once the missile is past, don't head directly back toward the target; instead, head off to the side.Position 4. When the site launches another missile at you, you can now turn back toward the site to get perpendicular and fool the missile.Position 5. Now when clear again, you may be close enough to head directly into the target and attack it before it can get another shot off. |
| Know of a tactic that belongs in here? SEND US AN E-MAIL! If we can, we'll post it! |